How to strengthen the steering rack on a VAZ 2114. Video about replacing the steering rack on a VAZ car.
Every car owner wants his car not to fail at crucial moments, to deliver a minimum of problems and bring maximum benefit. But it directly depends on how the owner cares, monitors, and repairs his car on time.
One of the most important nodes affecting security is steering . Owners of the VAZ 2114 do not have to repair steering racks so often, since these units have a fairly long service life. But a number of factors and time lead to the fact that you have to pay direct attention to the steering, diagnose the problem in a timely manner and quickly fix it.
Today we’ll talk about how to repair this node with your own hands, as well as what activities will bring your slightly worn out steering rack.
Symptoms
To understand that the rails need repair, you need to monitor the behavior of the car, know the characteristic signs of a malfunction of this element.
Is it possible to determine if the unit requires complete replacement or you can get by simple repair? This is explained in the table below..
Tightening and adjustment
As the practice and experience of the owners of the VAZ 2114 shows, if problems arise with the rails, they can most often be repaired. The only condition is that you have a viewing hole at your disposal.
The first step is to tighten the rail. But how is it done? To do this, simply tighten the adjusting bolt. Adjustment is carried out with a key of 17 millimeters.
After tightening the bolt, drive your car, drive a few kilometers to check if there is a knock or play. If these symptoms of a problem disappear after you tighten and adjust the steering rack, then the repair can be considered complete.
But that doesn't always happen. The knock may remain, and the play may go away, or vice versa. In any case, if at least one sign is still left, you will have to start a full-fledged repair with your own hands. Now you can find a number of useful videos that describe in detail the procedure for repairing this node. Look, it will be useful for you.
Issue price
A new rail will cost you about 3 thousand rubles. The cost of service stations for replacing rails costs about 2 thousand rubles. That is, in total, you will have to spend 5 thousand rubles, if you entrust the work to the masters.
However, the rail is not difficult to repair. Most VAZ 2114 owners do this event with their own hands. Plus great money savings.
We repair ourselves
To get started, you will need a set of tools and repair kits.
Be sure to include the following in your list of tools and materials:
- Repair kit of one of three complete sets (about them below);
- Bearings;
- Lubricant;
- A set of keys and screwdrivers.
Repair kit selection
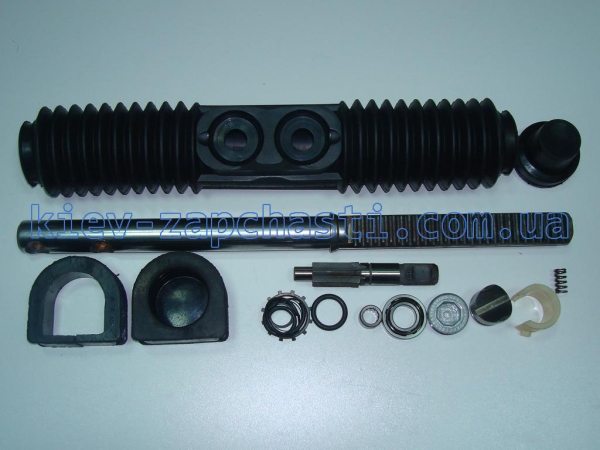
As for repair kits, the standard minimum set includes four elements:
- washers;
- nuts;
- Bearings;
- Bushings made of PTFE.
But will it be enough for your particular situation with steering racks? Let's try to understand the purpose and configuration of each of the three types of repair kits.
- The cheapest repair kit you are already familiar with allows you to solve the most minor problems that have arisen with your rails.
- The middle set additionally includes other bearings and shafts. Designed for more serious repairs.
- The most expensive repair kit may consist of whole new rails, that is, it provides more likely not for repairs, but for a simple replacement of units.
When choosing a repair kit, it is important to make sure that it is suitable not only for repairing steering racks, but also for your particular VAZ 2114 car. Plus, it is important to know which rack is currently on the car. If this is not a native part, which happens quite often, then the repair kit for the “fourteenth” model will no longer fit. You need a set to match the vehicle from which the steering system part was borrowed.
Repair
You still have to disassemble the steering wheel to make repairs. Detailed instructions You can look at the material on replacing the steering rack.
We proceed directly to the repair procedure.
- Remove the rail from your seat.
- Remove the thrust nut with a 17 mm hexagon.
- Remove the thrust nut, remove the retaining ring, spring, and rack stop.
- First, the boot of the gear shaft is removed, after which you can easily reach the retaining ring.
- Remove the nut that holds the gear bearing. Get ready for the fact that it will be quite difficult to unscrew it, make an effort. This is fine. Worse, if he practically does not hold.
- The drive gear shaft is pressed out.
- The rail is removed from the body.
- Next, remove the support sleeve, lubricate and put in place. It may take some effort to get it back.
- Replace all bearings present in the assembly. Some are difficult to extract, while others are almost impossible. But it needs to be done. If you can’t remove it at all, then cut the bearing with a chisel and remove it with tongs.
- Examine the condition of all surfaces, parts, assemblies for any defects or damage.
- If you notice faulty elements, replace them using the repair kit.
- The design will have a lot of moving parts. Each of them must be lubricated with high quality grease. Litol will perform well here.
- Reassemble following the reverse order of removal.
- For reassembly, you will definitely need help. Therefore, arrange in advance with a friend or someone else who can help you in this matter.
- Put the repaired rail in place, make its fasteners.
- A rake is inserted into the spitz. This is where you need an assistant. It's almost impossible to do it yourself.
- Use a chisel to loosen the clamps.
- Tighten all mounting bolts in place.
After assembling the node, be sure to check it in action. Please note that it is impossible to operate the car after that in the previous mode. To get started, be sure to call on a car service, where the wheel alignment will be carried out. Only after this repair of the node can be considered completed.
In the event that typical signs of rail failure are found, do not delay repairing or replacing it. This can lead to sad consequences when, at the most inopportune moment, the steering wheel stops responding to your efforts, you lose control of the situation. This is not an attempt to scare you, but the simple truth of life.
How to replace the steering rack on the VAZ-2114
If, when the steering wheel is turned sharply from the neutral position (the wheels are straight), extraneous knocks and noises are heard near the steering rack, this means that the steering rack is faulty on your VAZ-2114, 21099 car, and you need to urgently repair it.
An alternative to repair can be tightening the steering rack nut with a special wrench. This method can give a positive effect (although not always), but with possible consequences. For example, if the nut is tightened too much, then the resistance to the steering wheel rotation will increase, as well as more serious consequences, up to the steering wheel jamming, which can be extremely dangerous while driving.
It is better to repair the steering rack VAZ-2114, 21099 with an assistant, although you can do it yourself. Among necessary tool: tie rod puller (photo 18) and WD-40 fluid, which can be bought at any car market.
Below is the procedure for repairing the steering rack (maybe it is a little simplified, but during the repair everything will be clear to you):
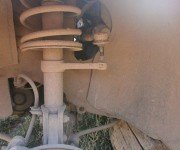
1. First of all, we raise the front of the car in order to achieve full overhang of both front wheels. Under rear wheels anti-roll bars should be placed (photo 1);
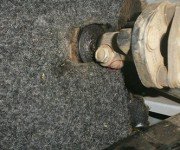
2. Remove the front wheels. At the same time, we check the condition of the anthers on the steering fingers (photo 2);
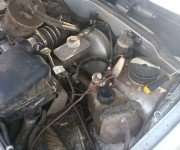
3. Now you need to get access to the steering rack mount. It is necessary to disconnect the gas adsorber, as well as the alarm siren, if it is available and installed in this particular place (photo 3). We remove the terminal with wires from the adsorber, and as far as the hoses allow, we take them to the side (again, photo 3). After removing these nodes, access to the steering rack mount is free (photo 4);
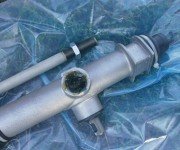
How to replace the steering rack on a VAZ-2114, 210994. In the case of installing a used steering rack, you should pay attention to the condition of the boot boot and steering rod silent blocks (photo 5);
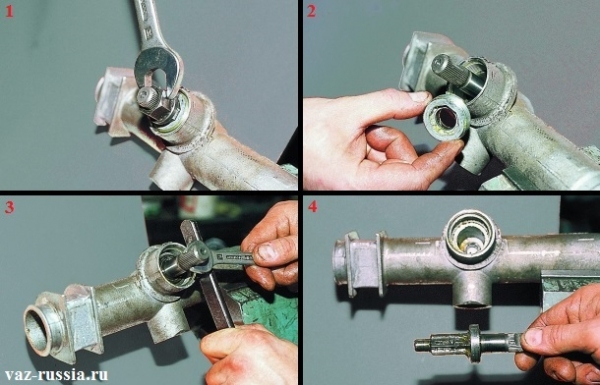
How to replace the steering rack on the VAZ-2114, 210995. Now we set the steering wheel to the neutral position (when the wheels look straight). Using a ring wrench, or with a head to universal joint we unscrew the bolt from the spline connection, which is located near the pedal assembly (photo 6, 7, 8);
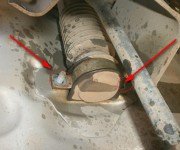
We clean the tie rod attachment point to the vehicle suspension struts from dirt (photo 9);
How to replace the steering rack on the VAZ-2114, 210997. After the fasteners are cleaned, using pliers, we pull out the locking cotter pin from the connection (photo 10), and then unscrew the steering tip nut (photo 11);
How to replace the steering rack on the VAZ-2114, 21099
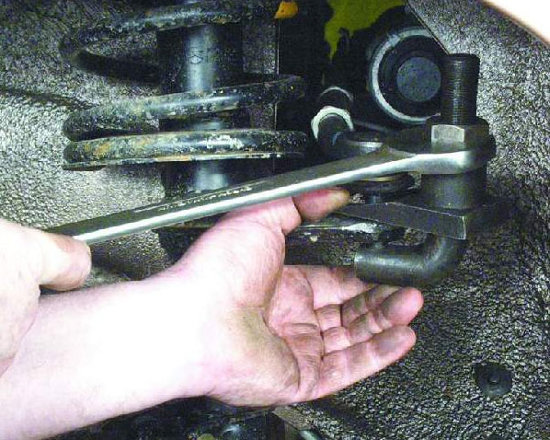
How to replace the steering rack on the VAZ-2114, 210998. Next, install the puller (purchased at the car market, photo 12), tightening the puller nut and gently tapping the puller from below with a hammer until the fingers of the steering tip come out of the cone connection (photo 13) ;
How to replace the steering rack on the VAZ-2114, 21099
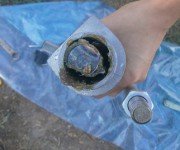
How to replace the steering rack on the VAZ-2114, 210999. Now, returning under the hood, you need to unscrew the nuts on the steering rack (photo 14, 15);
How to replace the steering rack on the VAZ-2114, 21099
How to replace the steering rack on the VAZ-2114, 2109910. Using a screwdriver, pull the steering rack off the mounts (photo 16) and pull it out through the window in the wheel niche (photo 17);
How to replace the steering rack on the VAZ-2114, 21099
How to replace the steering rack on the VAZ-2114, 2109911. Let's start installing the steering rack. In order to catch the required middle position of the steering rack, you must first install the steering fingers in the racks, after which we install the shaft on the splines in the cabin. The steering shaft in the cabin has free play, so you can easily install it in the desired position. Be careful, there is a groove in the steering rack for the clamp bolt, and you need to install it so that the clamp is opposite the groove, this will allow you to install the bolt back without any extra effort.
12. Now we assemble the entire steering assembly in reverse order.
How to replace the steering rack on the VAZ-2114, 21099 In case you also replaced the steering rods at the same time, then you need to restore the alignment. The technology for repairing the steering rack on the VAZ-2114,21099 is similar to repairing the steering racks on all VAZ cars with front-wheel drive.
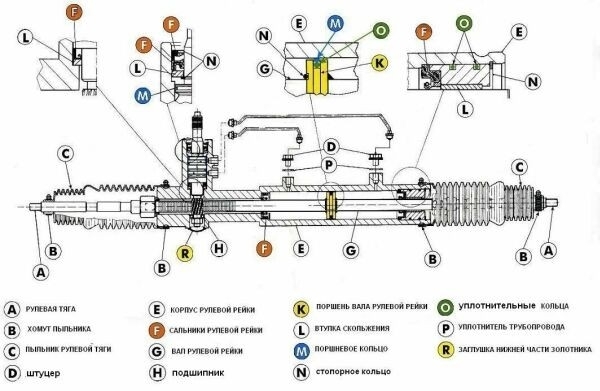
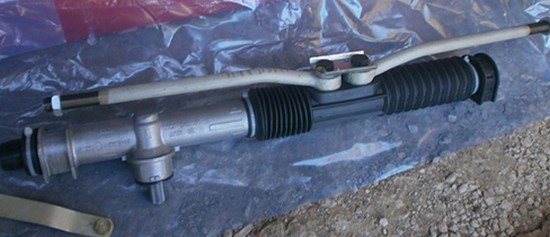
The steering rack is an integral part of the steering mechanism with which the car is steered. This device has a long service life and a significant level of reliability. In the event of problems associated with the steering mechanism, sometimes it is enough to tighten the steering rack.
Symptoms
Competent drivers know that the transmission of force to the wheels is carried out through a spur or helical gear, and it interacts with the rack. Backlash in the rail is eliminated with the help of clamping springs. When there is a knock of the steering mechanism, which is noticeable in the event of a collision with an obstacle, driving over bumps, it is necessary to adjust the rack.
Some VAZ 2114 drivers do not know that backlash and creaking in the rail can be eliminated, they believe that the steering rack cannot be tightened in a VAZ 2114 car. Adjustment helps to get rid of backlash and ensure high-quality control of the machine. It should be understood that incorrect adjustment of the VAZ rail can lead to a deterioration in the rotation of the steering wheel. This is caused by over tightening the adjusting screw.
Adjustment
Adjustment is carried out in this way: you can remove the rail from vehicle or adjust it on it. The first method is used after the repair of the machine, before installation. To simply adjust the rail, the work is done directly on the machine.
To carry out the work, you must have a 17 mm universal octahedron and an adjustable wrench. All troubleshooting work is carried out on a lift or inspection pit:
- First, the car must be put on hand brake, put some kind of emphasis on the rear wheels;
- Then it is necessary to block the steering wheel and de-energize the on-board network of the car (remove the negative terminal from the battery);
- Then you need to find the nut with which the steering rack is adjusted. It is located on the opposite, turned to the body, side of the rack mounting. Sometimes it is mistaken for another detail;
- First, wash the bottom of the machine. In this case, a suitable apparatus is used (Kercher, for example). This is done in order to clean the nut from a layer of dirt. After cleaning the part from contamination, a key is inserted into it to tighten the rail and adjust its position. The tool rotates clockwise.
Thus, the adjustment is considered complete. If, after the work done, the control of the machine is unsatisfactory, the backlash and knocking does not disappear, you should check the condition of the steering tips, they may need to be changed.
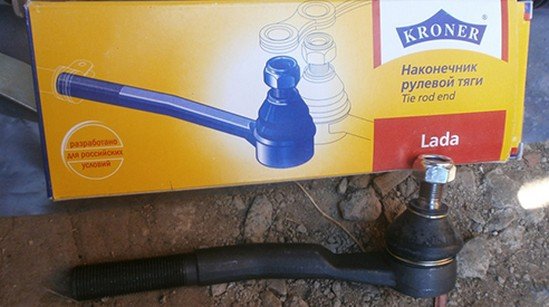
Steering tips: signs of malfunction
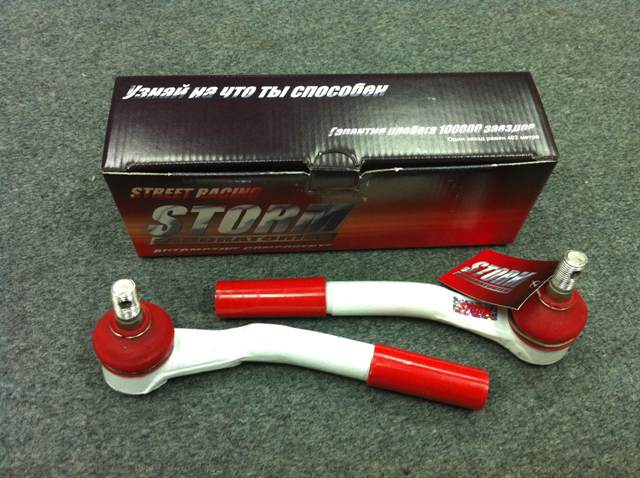
The steering tips are replaced when the following symptoms are observed: when driving over bumps, when accelerating, braking, a knock is felt, the steering wheel begins to vibrate and shake, backlash is noticed in the steering rod, recoil to the gas pedal is observed. You can fully check the health of the tips when checking the integrity of the anthers, etc.
Since these parts affect the alignment, they must be replaced in time so that the rubber does not begin to wear out unevenly.
The steering tips are changed immediately on both sides (if one breaks, then the other will break after a while).
How to replace the steering rack on the VAZ-2114
If, when the steering wheel is turned sharply from the neutral position (the wheels are straight), extraneous knocks and noises are heard near the steering rack, this means that the steering rack is faulty on your VAZ-2114, 21099 car, and you need to urgently repair it.
An alternative to repair can be tightening the steering rack nut with a special wrench. This method can give a positive effect (although not always), but with possible consequences. For example, if the nut is tightened too much, then the resistance to the steering wheel rotation will increase, as well as more serious consequences, up to the steering wheel jamming, which can be extremely dangerous while driving.
It is better to repair the steering rack VAZ-2114, 21099 with an assistant, although you can do it yourself. Among the necessary tools: a steering rod puller (photo 18) and WD-40 fluid, which can be bought at any car market.
Below is the procedure for repairing the steering rack (maybe it is a little simplified, but during the repair everything will be clear to you):
1. First of all, we raise the front of the car in order to achieve full overhang of both front wheels. Anti-roll bars should be placed under the rear wheels (photo 1);
2. Remove the front wheels. At the same time, we check the condition of the anthers on the steering fingers (photo 2);
3. Now you need to get access to the steering rack mount. It is necessary to disconnect the gas adsorber, as well as the alarm siren, if it is available and installed in this particular place (photo 3). We remove the terminal with wires from the adsorber, and as far as the hoses allow, we take them to the side (again, photo 3). After removing these nodes, access to the steering rack mount is free (photo 4);
How to replace the steering rack on a VAZ-2114, 210994. In the case of installing a used steering rack, you should pay attention to the condition of the boot boot and steering rod silent blocks (photo 5);
How to replace the steering rack on the VAZ-2114, 210995. Now we set the steering wheel to the neutral position (when the wheels look straight). Using a spanner wrench, or with a head to the cardan joint, we unscrew the bolt from the spline connection, which is located near the pedal assembly (photo 6, 7, 8);
We clean the tie rod attachment point to the vehicle suspension struts from dirt (photo 9);
How to replace the steering rack on the VAZ-2114, 210997. After the fasteners are cleaned, using pliers, we pull out the locking cotter pin from the connection (photo 10), and then unscrew the steering tip nut (photo 11);
How to replace the steering rack on the VAZ-2114, 21099
How to replace the steering rack on the VAZ-2114, 210998. Next, install the puller (purchased at the car market, photo 12), tightening the puller nut and gently tapping the puller from below with a hammer until the fingers of the steering tip come out of the cone connection (photo 13) ;
How to replace the steering rack on the VAZ-2114, 21099
How to replace the steering rack on the VAZ-2114, 210999. Now, returning under the hood, you need to unscrew the nuts on the steering rack (photo 14, 15);
How to replace the steering rack on the VAZ-2114, 21099
How to replace the steering rack on the VAZ-2114, 2109910. Using a screwdriver, pull the steering rack off the mounts (photo 16) and pull it out through the window in the wheel niche (photo 17);
How to replace the steering rack on the VAZ-2114, 21099
How to replace the steering rack on the VAZ-2114, 2109911. Let's start installing the steering rack. In order to catch the required middle position of the steering rack, you must first install the steering fingers in the racks, after which we install the shaft on the splines in the cabin. The steering shaft in the cabin has free play, so you can easily install it in the desired position. Be careful, there is a groove in the steering rack for the clamp bolt, and you need to install it so that the clamp is opposite the groove, this will allow you to install the bolt back without any extra effort.
12. Now we assemble the entire steering assembly in reverse order.
How to replace the steering rack on the VAZ-2114, 21099 In case you also replaced the steering rods at the same time, then you need to restore the alignment. The technology for repairing the steering rack on the VAZ-2114,21099 is similar to repairing the steering racks on all VAZ cars with front-wheel drive.
VAZ 2114 (Lada 2114) is a restyling of the VAZ 21 99, produced in 1994-24 and was the ancestor of the second generation Lada (Samara).
The performance of a car, like that of any mechanism, depends on the proper functioning of each part. One that fails, pulls others along - the principle of "chain reaction". One of these mechanisms is the steering rack. Its malfunction is not allowed, since defective steering is deadly. It is not allowed to operate the machine with such a malfunction. When a knock and crunch is heard when turning the steering wheel, the steering rack should be replaced, sometimes you can get by with tightening the bolts or replacing the seals. But if after that the problem remains, then you still need to replace the steering rack. Sometimes after tightening the bolts, the rotation of the steering wheel deteriorates a little, and often the steering wheel completely wedges.
Replacing the steering rack on a VAZ 2114 is not so difficult, but if there are no repair skills at all, then it is better to contact the service. You can carry out the replacement yourself, but it is more convenient to take an assistant to help.
Necessary tools for replacing the steering rack on a VAZ 2114
1. hexagon on "17";
2. steering rod puller;
3. tube - length 6, hole diameter 3;
6. a set of keys (open-end and box);
7. chisel (tooth width 5-7 millimeters);
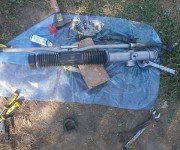
The process of removing and installing the steering rack on the VAZ 2114
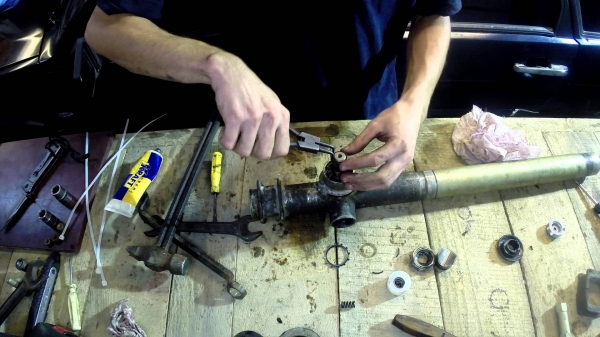
photo report on the process of the work done


![]()

![]()
1. We tighten the hand brake, block the steering wheel, put stops under the rear wheels, disconnect the AB terminal.
2. We tear off the bolts of the wheels of the car standing on the ground.
3. Jack up the car and remove the wheels.
4. Remove the wheels themselves and lubricate the unscrewed nuts with WD-4
5. We unscrew the cardan lock bolt in the cabin.
7. We unpin the tip nut and carefully knock it out of the rack. Remember that you cannot hit the thread.
8. If there is no special rod puller, then we use a mount or a hammer.
ten . On the right side we get the rail.
11. Then we knock it out of the spitz, usually it comes out without much difficulty.
12. Now the rail is removed - unscrew its tips and count the number of turns.
13. Open the side plugs in the new steering rack and fill the holes with lithol.
14. Carefully screw the tips. Be sure to pay attention not to confuse them in places, since the left one is different from the right one.
15. In order to put a new rail in place, you will need the help of a partner. We install the steering rack in place and bait the fasteners. The helper is needed in order to help get exactly into the pins of the steering cardan. You can use a chisel to loosen the clamp. The pins will go in much easier this way.
16. The steering rack has a special groove for the locking bolt, which is neatly installed there.
An interesting article on the topic with your own hands without resorting to auto services.
The steering rack is assembled in the reverse order of disassembly. We tighten the nuts on the steering rack, without crushing the rubber plugs, placing them correctly under the clamps. It is wiser to use self-locking nuts - they will not unscrew themselves. We spray the studs with lithol. We connect the levers of the racks and steering tips, tighten the nuts. Everything is ready, now we “shoe” the wheels, evaluating the state of the brake mechanisms during the process. Next, we put on the AB terminal and on the wheel alignment. Be sure to remember that after replacing the rack, a thorough adjustment of the camber / convergence should be carried out. The time that will be spent on work is approximately 4 hours.
Do-it-yourself steering rack repair for VAZ 2114, 2115, 2108, 2109, 21099, 2113 video
Related Articles