Vehicle alternator testing. How to check the generator on the car without removing it. Servicing a generator
An ohmmeter is used to check the removed generator. First, the outer surface of the generator is thoroughly cleaned of dirt with a soft cloth, then the positive probe of the device is connected to the output “30” of the generator, and the second probe is connected to the generator case and the resistance is measured. If it is close to zero, this can indicate both the failure of one of the diodes in the system, and the short circuit of the stator winding to the housing.
Then check the positive diodes of the generator. To do this, the positive end of the measuring device is connected to the output "30", and the second - to the bolt of the mounting system of the generator rectifier unit.
A resistance value close to zero indicates the failure of one of the diodes.
In order to check the capacitor, it is removed from the generator and the corresponding ends of an ohmmeter are connected to the terminals. When the capacitor is in working condition, the resistance indicated by the device must first decrease, and then begin to increase.
To check the negative diodes of the generator, it is necessary to attach the positive end of the ohmmeter to the bolt of the mounting system of the generator rectifier unit, and close the negative end on the generator case.
During normal operation of the diodes, the indicators of the device will differ from zero (Fig. 80).
Figure 80. Checking the generator diodes
The voltage regulator is also checked after removing it from the generator. If, in the free state, the brushes protrude from the brush holder by 5 mm or more, and when pressed, they move freely and springily in the grooves, the regulator can be operated further. Otherwise, the part needs to be replaced.
A voltmeter is used to check the operation of the voltage regulator. The positive terminal of the regulator is connected to the same terminal of the battery, the second one closes to ground, while the voltmeter should show the voltage at the contacts of the brush assembly; otherwise, the element does not work and the regulator needs to be replaced.
To check the condition of the generator rotor, one probe of the measuring device is attached to the housing, and the second is closed on the contact ring of the rotor (Fig. 81 a). If the device shows the presence of resistance, this indicates the absence of a short circuit in the rotor and the integrity of its winding (Fig. 81 b). Otherwise, the part must be replaced.
Figure 81. Checking the voltage regulator and generator rotor
During the diagnostics of the generator, the faulty elements of the system are replaced: a capacitor, a voltage regulator, a rotor or a stator.
If the test showed a diode failure, the alternator rectifier unit must be completely replaced.
TYPICAL FAULTS
PROBLEM - WEAK VOLTAGE IN THE ONBOARD NETWORK (VOLTAGE UNDER LOAD LESS THAN 13.6 V)
1. Check the generator regulator, if necessary, replace the part.
2. Check the alternator belt by pressing it with your thumb - the belt deflection should not exceed 1.5 cm. If the belt is loose, adjust its tension.
3. Check the diode bridge in the generator and the contact of the diode bridge with the generator housing. If the reason is the failure of the diodes, replace the diode bridge.
4. Check the junction of the winding with the diode bridge. When the winding leads are loosened or the contact is broken, it is necessary to solder the winding lead rings to the diode bridge and tighten the nuts.
The injection belt is longer than the carburetor belt, so be sure to take the belt that matches your engine type when buying.
PROBLEM - WHEN THE ENGINE IS RUNNING, THE PILOT LIGHT IS ON, THE BATTERY IS RECHARGED
Check voltage regulator. There is probably a short circuit between ground and the "DF" terminal. The regulator must be replaced with a new one.
PROBLEM - WHEN THE ENGINE IS RUNNING, THE PILOT LIGHT IS ON FULL OR BRIGHTLY, THE BATTERY IS DISCHARGED
1. Check the supply diodes of the excitation winding. If they are damaged, it is necessary to replace them or the rectifier unit.
2. Check the voltage regulator. If a defect is found, replace it with a new one.
3. Check the stator winding. In the event of a short circuit, open circuit or short circuit to ground, the generator stator must be replaced.
4. Check the excitation winding leads. Perhaps they were soldered from slip rings. Solder the leads or replace the generator rotor.
5. Check the operation of the rectifier unit valves. If necessary, replace the rectifier unit with a new one.
6. Adjust the belt tension if the alternator drive belt is slipping.
PROBLEM - THE PILOT LIGHT DOES NOT ILLUMINATE BOTH WHEN THE IGNITION IS ON AND WHEN THE ENGINE IS RUNNING, THE BATTERY IS DISCHARGED, THE CONTROL INSTRUMENTS WORK
1. Check the positive valves for a short circuit. If it is found, replace the rectifier unit.
2. Check the voltage regulator for damage.
There is probably an open between ground and the "DF" terminal. In this case, the voltage regulator must be replaced.
3. Check the "KB" wire and its connections (from the instrument cluster to the generator).
If an open is found in the circuit between the generator plug "D" and the instrument cluster, repair the fault.
4. Check the excitation winding leads. If they are soldered from slip rings, the leads should be soldered or the generator rotor replaced with a new one.
5. Check the wire from the output "D" of the brush holder. In case of disconnection, the wire must be connected to the terminal.
6. Check brushes for sticking and wear. If necessary, replace the brush holder with brushes.
7. Check slip rings. In case of oxidation, they should be wiped with a cloth soaked in gasoline.
8. Check the test lamp. If it is burned out, replace it with a new one.
9. Check the tightness of the lamp holder contacts against the printed circuit board. If necessary, bend the contacts of the cartridge or replace it with a new one.
PROBLEM - THE GENERATOR IS TOO MUCH
1. It is possible that the stator winding shorted to ground or an interturn short circuit occurred. In this case, the stator must be replaced.
2. Check generator bearings. If damage is found, replace the front bearing cap or rear bearing.
3. Check generator fans. If a short circuit is detected in one of them, it is necessary to replace the rectifier unit.
Checking the health of the voltage regulator in the generator
The first step is to inspect the brushes. Their protrusion from the holders should not exceed 5 millimeters. The brush must move freely in the holders, must be intact and not worn out. Next, connect the positive terminal to the output of the device, and the negative terminal to the voltage regulator ground. We connect the control light to the brushes. We apply 13.3 volts to the regulator, while the light should light up. After increasing the voltage to 14.3 volts, the control lamp will go out, as the regulator has stopped supplying voltage to the brushes. When the voltage drops to 13.3 volts, the lamp should work.
Checking the performance of capacitors
Connect an ohmmeter to the capacitor. If it is serviceable, then regardless of the polarity of the connection, the initial resistance increases smoothly and soon stops changing. This is an indicator of the health of the capacitor. You probably realized that checking a car's generator is not at all difficult. It requires some training, dexterity and a set of appropriate instruments, which can be purchased at any automotive market.
Checking the integrity of the diode bridge of the generator
To check the diode bridge of the car's generator, set the ohmmeter to the diode test position. Connect the positive terminal of an ohmmeter to the common diode rail. We connect the "negative" terminal to the output of the diode. If the resistance is infinite, the diode is good, and if the device provides other parameters, then the diode needs to be replaced. The next step is to swap the positions of the ohmmeter terminals. Resistance results should be near zero. So we check each diode to get an accurate result. Next, we check if the diode breaks through the body. With the positive terminal of the ohmmeter, we touch the plate on which the diodes are located, and with the negative terminal, as in the previous version, to the output of the diode. At zero resistance- the diode is not working, but if it is infinite - it is working.
Bearing check
Here, only the electrical component of generator malfunctions is considered, but we must not forget about the mechanical problems with this type of device. You should not forget about the most common problem with generators, this is the failure of the bearings of the device. Checking the car's generator for the performance of its bearings is not so difficult. Usually, at the same time, the generator makes unpleasant grinding noises that are noticeably audible when you are near the car or in the cabin.
This problem occurs both in old generators and in new, modern devices. Here, basically, a lot depends on the correct and adjusted tension of the alternator drive belt. In the event that the belt is overtightened, it will soon be possible to prepare for a serious repair of the generator bearings, as a rule, this leads to the discharge of the battery and its early failure, especially in winter. The first signs of this problem are the blinking of the battery charge indicator light, which is located on the dashboard of the car and has a red color.
If you do not have this indicator, which is quite rare in modern cars, then purchase a special indicator device with a set of LEDs that is mounted in the cigarette lighter socket and signals the battery charge level. There are also more "fancy" electronic counterparts, but functionally they do not differ much and cost an order of magnitude more expensive.
The automotive alternator is one of the key components of the electrical equipment of the car, it is operated in harsh conditions and is constantly under heavy load. The designer of the generator fully takes into account the features of its operation, paying attention to achieving high operational reliability. However, it is not possible to exclude failures of this node.
Diagnostics of electrical equipment at service stations during scheduled maintenance is included in the list of mandatory checks. Its implementation reveals the malfunctions that have appeared and the high degree of wear of individual components, including the generator. However, even regular maintenance of the car in certified workshops is not a guarantee against sudden failures.
The following are the procedures for checking the generator, which allow using simple means to assess its technical condition with high accuracy. A feature of this device is the design of generators different cars is based on identical principles, so the same verification methodology is applied to them, which may differ only in minor details.
It is advisable to carry out work on checking the health of the generator according to a large-block scheme, and only after localizing the faulty node, proceed to accurate diagnostics. We will not dwell on the intricacies of identifying a malfunction of a particular unit of this unit, which are performed according to our own methods.
Signs of a Failing Alternator
The external ones are:
- corresponding optical indicator on dashboard remains active or flashes when the engine is running;
- extraneous noise;
- heating the case to too high a temperature;
- characteristic smell of burnt insulation;
- dim headlights, flashing lights, precarious work other consumers of electricity (primarily powerful ones), which is clearly manifested when the battery has exhausted its resource;
- battery discharge at a high rate.
When instrumental control is additionally taken into account
- non-compliance of the generated voltage with the passport value, taking into account the available tolerances in a wide range of loads;
- complete lack of stress.

Preparing for the test
Before starting the actual diagnosis:
- the condition of the contacts is checked and, if necessary, their fasteners are tightened and cleaned from oxides.
- the connecting wires are inspected and, if they are damaged, they are replaced with serviceable ones of the same length and cross section.
Accurate results are achieved using a household multimeter (electrical tester). It is desirable that the device has a separate input for connecting current clamps.
Prohibitions
When performing testing, under no circumstances should you perform the following actions:
- It is forbidden to disconnect the wires from the generator output. It must always have a load.
- It is unacceptable to perform testing by the “spark” method - to short-circuit the generator output.
- The state of the insulation cannot be monitored with a gigaohmmeter (because of the risk of insulation breakdown by the high measuring voltage of this device).
Checking the drive belt tension
Violation of the standard tension of the generator drive belt leads to the fact that when operating without load, the voltage is normal, but with an increase in load, insufficient friction will lead to a slip effect, the required power is no longer transmitted to the generator shaft, and the voltage drops. The load is increased by switching on various consumers in series, for example, headlights.
If such a phenomenon is detected, we check the belt deflection, which, when pressed with a force of 10 kg, should not be more than 12 mm. In the case of a loose belt, we restore its tension, which is done with an adjusting screw, with which the generator stator is moved away from the engine shaft. 
Basic checks without dismantling the generator
The procedures described below are carried out with a warm engine running at idling 10 - 15 minutes. The primary check is based on the fact that the voltage taken from the generator exceeds the voltage of the battery (a necessary condition for its recharging). To do this, turn off the engine and with a multimeter, which is switched to the mode of operation with a constant voltage (limit 20 V or in it), measure the voltage at the battery terminals. Then the engine is started, a second measurement is taken and the results are compared. If there is no change, the alternator is faulty.
The second group of tests is aimed at, for which they continue to monitor the output voltage of the generator with a multimeter. Its readings with the engine running are 14 V. With an increase in the shaft speed, the voltage increases, but by no more than 0.5 - 0.7 V. If this condition is violated, more detailed checks are carried out, the process of which is described here. 
To check the generated current, the engine speed is increased to medium. Current clamps are connected to the multimeter, the device is switched to the DC current measurement mode, the wire from the generator output is covered by the working body of the clamps.
Next, consumers of electricity (headlights, interior heater, etc.) are turned on in sequence, the readings of the device are recorded. Then the previously used consumers are turned on simultaneously and the multimeter readings are compared with the sum of the recorded values. The difference should not exceed 5A, otherwise the generator is considered faulty.
multimeter or the method of dialing a light bulb for the absence of breakdown of diodes and an open in conductive circuits. Diagnostics of the diode bridge is carried out on the engine or after dismantling the generator.
Checks with dismantling the generator
The dismantling of the generator is carried out if it is clearly established that it is faulty.
Initially, an inspection is carried out, which shows the absence of mechanical damage to the case, the normal state of the electrical terminals and other components.
Carbon deposits on slip rings are a good indicator of an interturn short circuit in the rotor windings.
Winding resistance test
To check the resistance of the windings, the multimeter is switched to the resistance measurement mode.
To determine the resistance of the rotor winding, the multimeter probes are connected to slip rings. The instrument reading is 10 ohms.
The stator winding is checked only after disconnecting the connecting wires from the terminals. Measure both the resistance between the free ends of the windings, and between the free end and the common point. The stator is considered serviceable if
- the resistance of a separate winding is in the range of 5 - 15 ohms;
- the resistance between the free ends of the windings is twice the resistance of the individual windings;
- winding resistance is the same.
brushes
Brushes are checked by visual inspection. Serviceable brushes should move freely along the guides and not have chips. With a large degree of wear, they are replaced with new ones.
Thrust bearings
The generator rotor is mounted on support bearings. Their condition is checked with the belt removed from the pulley. With serviceable bearings, the rotor rotates freely, and its rotation does not require any effort. If play is found, the bearings must be replaced.
Conclusion
Accurate diagnostics of the health of a car generator is carried out on its own using simple and common household measuring instruments. The failed generator is restored by replacing the diode bridge, relay-regulator, support bearings and brushes and tension adjustment drive belt. In other cases, you will need to purchase a new one.
Knowledge of simple testing methods will allow you to restore the normal operation of electrical equipment without contacting a car service and save money.
Seal
Sometimes a motorist faces the question of checking the generator of his car. After all, it is very important to prevent and eliminate possible malfunctions in time, which can lead to battery failure and problems with starting the engine. The ideal option would be to entrust this matter to a specialist, but if this is not possible, you can check the generator and, most importantly, have a multimeter available.
How to check the generator without removing it from the car
In this case, you can check the generator and . It is necessary to connect a multimeter to the battery and measure the voltage in various modes with the engine running. To do this, you need to give an electrical load: turn on / off the headlights, press the gas pedal, turn on the stove, and so on. If, experimenting in this way, you can notice that the voltage is kept within 14-14.2 Volts, then we can safely say that everything is in order with the generator and the charging relay. If jumps of more than 0.5-1 Volt are observed, there are malfunctions.
How else can you test the generator
First, check the belt tension: sometimes it's all about loosening it. Having disassembled the generator in conditions, it is worth checking the rotor. To do this, you need to find out what is the resistance between the slip rings of the stator. If these figures do not exceed 5-10 ohms, then everything is in order, if this figure is higher - perhaps somewhere there was a break in the windings. Next, using a multimeter, you need to check the breakdown of each ring for ground. If there is resistance between the rotor and each ring, then there is no need to talk about a breakdown, if there is none, then there is a breakdown. With such a breakdown, it is impossible to repair the generator at home.
Checking the diode bridge is easy. As you know, it consists of 6 - three positive and three negative. It is necessary to disconnect all the leads from the plates with diodes and conduct a test: attach the probes to the diode leads, and then repeat the experiment, swapping them. In one position, a beep should be heard, and in the other not. If a squeak is heard in both directions, we are talking about a hole in the diode, which means it will have to be changed. But without sufficient experience, this is difficult to do, so you have to change the entire diode plate.
The stator must be carefully examined - there should not be any burning or damage to the winding. After you need to ring the winding with a multimeter. As for the bearings, nothing should interfere with their free rotation: there should be no noise and play. The brushes should protrude from the edges by only 5 mm. Chips, jamming and backlash are excluded. If there are any deviations, it is better to replace.
The operation of the car often presents various surprises. Devices that we did not even think about working may fail. It is always necessary to monitor the main units and monitor their condition in order to be able to prevent an unpleasant breakdown in the middle of the road. If you think that buying an expensive European car will save you from having to check the operation of various components, you are mistaken.

One of the most delicate and difficult to repair units in the design of a car is a generator. This node performs the important task of energy recovery, which allows you to switch the operation of all electrical appliances from the battery directly to the generator. Due to the correct functioning of this node, we can use battery five to seven years, only recharging it a few times.
The simplest methods for checking generator malfunctions
Let's start with very simple troubleshooting options. If you have a dear modern car, while starting the engine, always look at the messages on the on-board computer. An error code message may appear on the screen for a few seconds to help you identify any malfunctions in the generator system.
The error code must be reported to the service center or information found on the Internet, which will help you find out the cause of the breakdown with accuracy to the smallest detail. If the car just asks to go for diagnostics, you must definitely do this, and not guess what the problem might be. The simplest and effective methods generator checks are as follows:
- start the car and turn on the headlights, music, air conditioning and other electrical appliances, open the hood and listen to the generator;
- with the car running and the high or low beam headlights on, press the gas pedal several times, notice if the light intensity changes;
- after a sufficiently large load on the generator (for example, a long trip in the evening), try the body of the device with your hand - it should not be too hot;
- listen to the generator at idle - it should not make extraneous sounds, whistles and squeaks;
- look in the dark at a working generator - if there are any sparks and other light accompaniments of work in it.

To safely test the generator while it is running, make sure that no sleeves or other pieces of clothing are hanging loose and cannot be caught by the device. Otherwise, you will have a hard time, because it will be difficult to release clothes from the engagement of the belt. It is better to avoid such moments, which will ensure your safety.
This generator check is an approximation and will not give you accurate data. But if you determine that there are signs of a malfunction in the device, it will be possible to quickly make the necessary repairs at the station. Maintenance. After all, otherwise you may not know that the generator is the cause of all the problems in the operation of your car.
A more detailed and accurate test of the generator in the car
Another test method, which can only be tested on domestic cars and foreign cars before 1998, will help you understand if the generator is working. Start the engine and let it warm up to normal operation. Then remove the negative terminal from the battery. If the engine stalls, then the alternator is faulty.
This method of verification makes it easy to obtain data on the operation of the generator. True, the answer will be quite simple - either the device works or it does not work. That is, if you find out that the generator is not working, you will have to go to the service station to determine the specific cause of the breakdown. You can’t do this in new cars, because several serious problems can happen:
- the generator can simply fail if the charge sent to the battery by it does not reach its destination;
- the voltage regulator may also break, the replacement of which will cost you a fairly large amount;
- the computer can simply block the system, the engine will stall when the terminal is disconnected, but will not show a generator failure;
- actions electronic system engine controls under such circumstances can be generally unpredictable;
- after this completion power unit it might not be easy to get it running again.

So it is better to refuse such a verification method if you have a new generation car at your disposal. Even new domestic cars will not be grateful to you for this way of testing the operation of the generator. But there are several more options for checking this device. You can use a voltmeter or meltimeter to measure the voltage at the output of the generator.
To do this, you need to get a voltage measuring device, as well as open the car's operating instructions on the page describing the operation of the generator. There are numerical voltage data and contacts that must be measured with a voltmeter. This verification method is the most reliable, but rather difficult to perform, because you need to measure a working generator.
Servicing a generator
To get answers to all questions and stop the problems of the car in the field of the electrical system, you need to contact a specialized master. This may be an official service station or a specialist who repairs the alternators of your brand of car. The main thing is that the person has a decent qualification and enough knowledge about the operation of the generator in your car model. The main advantages of such a service for the car owner are as follows:
- there are no risks of accidental breakdown of other vehicle components during inept checks;
- obtaining reliable results that are confirmed by a professional;
- the ability to quickly fix problems with the help of a specialist;
- performing only those work that will lead to the correction of problems, no spraying;
- high-quality diagnostics of the entire electrical system and the detection of the most obvious problems.
With the help of a specialist, you can fully adjust the operation of your car, forget about possible troubles and problems. Professional service to help you get the most out of your vehicle. You just need to choose a specialist who is really well versed in your equipment and can provide professional repair services. Such a master will allow you to get a working car within a few hours after being handed over for repairs.
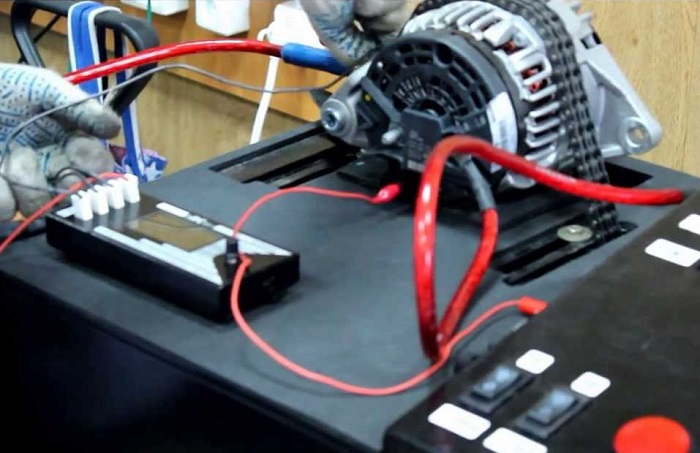
We offer a visual look at the procedure for checking the generator using a voltmeter:
Summing up
One of the most important moments in the operation of the car - correct functioning all systems. It is imperative to use the possibilities of high-quality and reliable operation of the generator, as well as monitor possible malfunctions. If it seems to you that the generator is not working properly, and on-board computer constantly gives some errors, you should go to the service and solve this problem. Otherwise, at one terrible moment, the car may simply stop in the middle of the road.
By using quality repair you'll be able to get your car back up and running with no hassle and get the maximum reliability that every driver expects from their vehicle. If you have experienced alternator failure, please describe the symptoms of these problems on your car model below in the comments.
The main source of power in the car is the generator, it is such a "mini-power plant". Incorrect or unstable operation of this node is fraught with bad (battery). A failed generator does not provide charging, therefore, the on-board network of the car will work on a battery that will not last for a long time. As a result, the battery is completely discharged, the engine "stalls" somewhere outside the city, and you have a new "headache" and the need to replace the generator.
In order to prevent such a scenario, it is necessary to regularly monitor the status of this device, as well as the charging it gives. If you notice any interruptions in work, you need to check the generator, and you will now learn how to do this.
But before that, I consider it necessary to talk about precautions and certain rules that must be observed when checking this electrical appliance in order not to damage it.
!!! It is forbidden:
- Check the performance of the generator by short circuit, that is, "to a spark."
- Connect terminal 30 (in some cases B+) to ground or terminal 67 (in some cases D+).
- Allow the generator to work without consumers turned on, it is especially undesirable to work with the battery disconnected.
- Carry out welding work on the car body with the wires of the generator and battery connected.

- !!! Important:
- Checking is done with a voltmeter or ammeter.
- Checking the valves is carried out with a voltage not higher than 12 V.
- In the case of replacing the wiring of the electric generator, it is necessary to select wires of the same cross section and length.
- Before checking the device, make sure that all connections are working and that the drive belt is properly tensioned. A belt is considered correctly tensioned, which, when pressed on the middle with a force of 10 kg / s, bends by no more than 10-15 mm.
How to check the generator with a multimeter or voltmeter?

Checking the voltage regulator
- In order to check the voltage regulator, you will need a voltmeter with a scale from 0 to 15 V. Before starting the test, warm up the engine for 15 minutes at medium speed with the headlights on.
- Measure the voltage between the terminals of the "mass" of the generator and "30" ("B +"). The voltmeter should show normal voltage for the particular vehicle. For example, for a VAZ 2108, it will correspond to - 13.5–14.6 V. If the voltage is lower or higher, most likely the regulator needs to be replaced.
- In addition, you can check the regulated voltage by connecting a voltmeter to the terminals. It should be noted that the result of such a measurement will not be accurate if you are sure that the wiring is 100% correct. In this case, the motor should operate at medium speeds close to those with the headlights on and other consumers of electricity. The voltage size must match a certain value for a particular car model.
Checking the diode bridge of the generator
- Turn on the voltmeter in measurement mode alternating current and connect it to ground and terminal "30" ("B+"). The voltage should be no more than 0.5 V, otherwise there is a possibility of diode failure.
- To check the breakdown to "ground", it is necessary to disconnect the battery, as well as remove the generator wire that goes to the "30" ("B+") terminal.
- Then connect the device between terminal "30" ("B+") and the disconnected wire of the generator. If the discharge current on the device exceeds -0.5 mA, it can be assumed that there is a breakdown of the diodes or the insulation of the generator diode windings.
- The recoil current strength is checked using a special probe, which is an addition to the multimeter. It is something like a clamp or tongs, which covers the wires, thus measuring the strength of the current that passes through the wire.
Checking the recoil current
- To measure the recoil current, you need to cover the wire with the probe, which goes to the terminal "30" ("B+").
- Then, start the engine and take a measurement, during the measurement, the engine should run at high speeds. Turn on electrical appliances in turn and take measurements for each consumer separately.
- Then count the readings.
- The following test must be carried out with all power consumers switched on at the same time. The measurement value should not be lower than the sum of the readings of each of the consumers, when you measured each of them in turn, a discrepancy of 5 A downwards is allowed.
Checking the generator excitation current
- To check the excitation current of the generator, start the engine and give it high speed.
- Place the measuring probe around the wire connected to terminal 67 (“D +”), the readings on the device will correspond to the value of the excitation current, on a working generator it will be equal to - 3-7 A.
To check the excitation windings, you will need to remove the brush holder and voltage regulator. It may be necessary to clean the slip rings, also check for breaks in the winding or shorts to ground.
Related Articles